This guide details the process of removing CMMG's Plan B style muzzle devices, which are secured with Hot Lock thread locker. The video explains that if the device is not heat-cured, it can be removed with a 13/16 inch wrench. However, if heat-cured through shooting or direct application, removal requires soaking in water for at least 30 minutes, potentially followed by a penetrating lubricant. The presenter, Mike from CMMG, emphasizes that heat-curing makes the attachment permanent.
This video details an experimental test to determine if PB Blaster penetrating oil can compromise the seals of modern 9mm ammunition. The speaker, a firearms enthusiast and gear tester, submerges ammunition in PB Blaster for up to a month and then tests its reliability by firing it from a Glock 17 Gen 4. The results indicate that modern ammunition remains reliable even after prolonged exposure to the penetrating oil.
This video details an experiment testing the durability of 9mm ammunition when submerged in PB Blaster for extended periods. The speaker, a firearms enthusiast and gear tester, demonstrates proper range safety and structured testing. Ammunition soaked for one week in PB Blaster was fired through a Glock 17 without issue, suggesting a high tolerance for this type of exposure.
This video details an experimental test by Collapse N Protect to determine if PB Blaster penetrating oil can degrade 9mm ammunition. The experiment involves soaking rounds for 24 hours, one week, and one month, followed by live-fire testing on a Glock 19. Results indicate potential underpowering and malfunctions like stovepipe jams after 24 hours, suggesting ammunition degradation. The speaker, an enthusiast conducting controlled testing, demonstrates safe range handling and identifies specific firearm malfunctions.
This guide details the process of replacing rear brake pads on a Yamaha Warrior 350. It covers the removal of caliper bolts, piston retraction using a C-clamp, cleaning components, and the reinstallation of new pads and bolts. Specific torque recommendations are provided for the bolts, and tips for dealing with seized or difficult components are included.
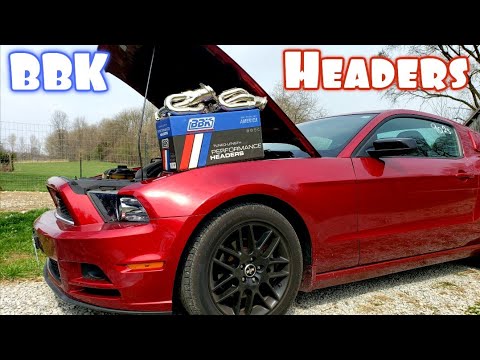
This guide details the complex installation of BBK shorty headers on a 2011-2017 Ford Mustang 3.7L V6. It highlights the significant challenges, including extremely tight bolts, the necessity of using provided hardware, potential steering shaft interference, and the critical gasket break-in procedure. Proper tool selection, patience, and attention to detail are paramount for a successful installation.
This guide details the process of replacing the crankshaft seal on a 2002-2006 Nissan Altima or Sentra equipped with the 2.5L QR25DE engine. It covers the removal of the crankshaft pulley, the seal itself, and the reinstallation of the new seal and pulley, emphasizing the use of specialized tools like a slide hammer and impact gun for efficiency and safety. The instructor, with nearly 20 years of automotive experience, highlights potential challenges and offers advice for DIY mechanics.
This guide details the installation of a 2J Racing lightweight aluminum crank pulley on a 2006 Nissan Altima with the QR25DE engine. The process involves removing the front wheel, serpentine belt, and the old pulley, then installing the new pulley and torquing the bolt to 87 ft-lbs. The video emphasizes the importance of proper tools like an impact gun and slide hammer, and offers advice for achieving correct torque without specialized tools, while also noting the potential for increased horsepower and mid-range torque.
This guide details the process of replacing a front wheel bearing hub on a 2002-2005 Ford Explorer. It covers preparation, removal of components like the caliper and rotor, dealing with seized parts, installation of a new MOOG hub, and final torquing procedures. The video emphasizes using appropriate tools and torque specifications for a successful repair.
This guide details the process of replacing a front wheel bearing hub on a 1998-2003 Dodge Durango. It covers the removal of the wheel, caliper, axle nut, and hub assembly, emphasizing the importance of penetrating oil for rusted components and proper torque specifications for reassembly. The guide also includes tips for dealing with seized parts and preparing the new hub with grease. The procedure is suitable for intermediate DIY mechanics familiar with basic automotive repair tools and safety practices.
This guide details the process of replacing a degraded exhaust donut gasket on a 2006 Toyota Corolla or Matrix, addressing common issues like rusted bolts and exhaust leaks. It covers preparation, specialized tool usage for bolt extraction, and proper installation techniques for a secure seal, drawing on practical, hands-on instruction.
You've reached the end! 11 videos loaded.
Gun Laws by State
Read firearms regulations for all 50 states + D.C.
Find Gun Dealers
Search licensed FFL dealers near you.