CM9 Gen 2 by Sarsilmaz Unbox and Field Strip

Published on July 17, 2017
Duration: 14:32

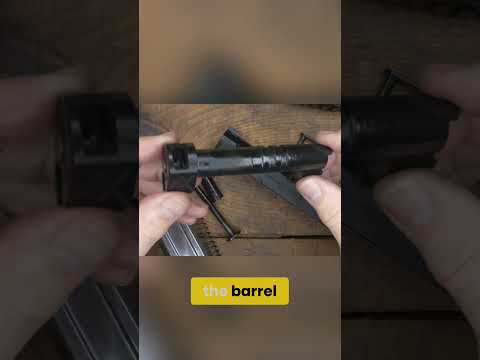
This guide details the field stripping process for the Sarsilmaz CM9 Gen 2, as demonstrated by an experienced firearms instructor. It covers the necessary steps for disassembly, internal inspection, and reassembly, highlighting the dual recoil spring system and polished internals. The instruction emphasizes safety protocols throughout the process.

Quick Summary

The Sarsilmaz CM9 Gen 2 features a DA/SA action and a slide-in-frame design. Field stripping involves aligning frame and slide dots to remove the takedown pin, revealing a dual recoil spring system and polished internals. It includes interchangeable backstraps for grip customization and has a trigger with a smooth single-action break and positive reset.

Chapters

  1. 00:00Unboxing and Contents
  2. 01:00Initial Impressions and Features
  3. 03:41Grip Customization
  4. 07:04Trigger Assessment
  5. 09:36Field Strip and Internal Inspection

Frequently Asked Questions

How do you field strip the Sarsilmaz CM9 Gen 2?

To field strip the Sarsilmaz CM9 Gen 2, first ensure it's unloaded. Align the dots on the frame and slide, then remove the takedown pin. Disassemble the slide assembly, noting the dual recoil springs, and inspect the internals. Reassemble in reverse order.

What are the key features of the Sarsilmaz CM9 Gen 2?

The CM9 Gen 2 features a DA/SA action, a slide-in-frame design, front cocking serrations, a witness window, ergonomic finger grooves, and a manual thumb safety. It also includes interchangeable backstraps for grip customization.

What ammunition was used for testing the Sarsilmaz CM9 Gen 2?

During the chamber testing phase of the review, Nosler Match Grade Handgun Ammunition was utilized to verify the firearm's chambering reliability and overall function.

What is the trigger like on the Sarsilmaz CM9 Gen 2?

The Sarsilmaz CM9 Gen 2 has a DA/SA trigger. The double-action pull has some initial friction, while the single-action pull features a slight take-up followed by a smooth break and a positive reset.

More Gunsmithing & DIY Videos You Might Like

More from GBGuns

View all →