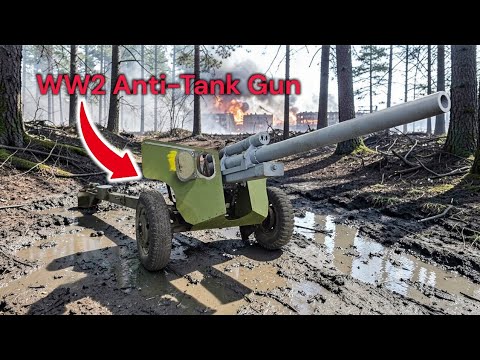
Part 2 of Restoring the 76.2mm M5 Anti-Tank Gun #restoration #military #history #army

Published on March 30, 2026
Duration: 1:23

This video details the initial disassembly phase of restoring a 76.2mm M5 anti-tank gun and its M6 carriage. Key steps include removing seized pins from the carriage legs using heat and force, cleaning all components, and disassembling wheel hubs and bearings. The process emphasizes meticulous labeling of parts for the subsequent restoration stages.

Quick Summary

Restoring a disassembled 76.2mm M5 anti-tank gun involves initial disassembly to ensure functionality. Key steps include removing seized pins from the carriage legs using oil and heat, cleaning all parts, and disassembling wheel hubs and bearings. Meticulous labeling of components is vital for correct reassembly and subsequent restoration.

Chapters

  1. 00:00Introduction: M5 Anti-Tank Gun Restoration
  2. 00:05Previous Day's Progress: Leg Removal
  3. 00:09Dealing with Seized Pins
  4. 00:15Cleaning Pins and Holes
  5. 00:20Gun Received Disassembled
  6. 00:35Restoration Plan Overview
  7. 00:41Disassembling Wheels, Hubs, and Bearings
  8. 00:54Planning Aesthetic Restoration
  9. 01:04Importance of Component Labeling
  10. 01:16Hardware and Skid Removal

Frequently Asked Questions

How are seized pins typically removed from historical military equipment like the M5 anti-tank gun carriage?

Seized pins on historical military equipment often require a combination of penetrating oil and heat to break the corrosion bond. Once loosened, they can be driven out using a hammer and a suitable punch or drift.

What is the initial phase of restoring a disassembled military weapon like the 76.2mm M5 anti-tank gun?

The initial phase involves taking everything apart to ensure functionality. This includes removing components like legs, pins, wheels, hubs, and bearings, followed by thorough cleaning and labeling of all parts.

Why is meticulous labeling important when restoring a disassembled military weapon?

Meticulous labeling is crucial when restoring a disassembled weapon because it ensures that all components are correctly identified and placed during reassembly. This prevents errors and ensures proper function and appearance, especially before painting.

What is the general process for restoring a vintage piece of military ordnance?

The general process involves first disassembling and cleaning components to ensure functionality. Then, aesthetic restoration decisions are made, followed by a complete teardown for detailed restoration work, including painting and reassembly.

More Gunsmithing & DIY Videos You Might Like

More from Ordnance

View all →