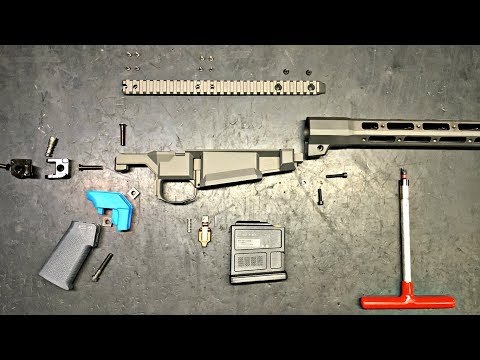
Quick Tip: Howa Build With The MDT Field Stock

Published on January 15, 2024
Duration: 15:34

This guide details the process of installing a Howa barreled action into an MDT Field Stock. It covers removing the original bottom metal, seating the action, and torquing the action screws to secure the build. The video emphasizes that this process does not require specialized headspacing tools or a lathe, making it accessible for DIY enthusiasts.

Quick Summary

Installing a Howa action into an MDT Field Stock is a straightforward process that doesn't require specialized gunsmithing tools like a lathe. Key steps include removing the original bottom metal, seating the action properly in the stock, and torquing the action screws to specific values (around 45 in-lbs front, 40 in-lbs rear). The MDT Field Stock offers features like an adjustable cheek piece and M-LOK compatibility.

Chapters

  1. 00:00Introduction to MDT Field Stock
  2. 00:14MDT Field Stock Features (Color, Cheek Piece, LOP)
  3. 00:56Sling Studs and Grip on MDT Field Stock
  4. 01:14Ambidextrous Design and Action Cut
  5. 01:43Internal Construction: Aluminum Bed Block and Trigger Guard
  6. 02:00Magazine Compatibility (AICS)
  7. 02:13M-LOK Slots and Polymer Forend
  8. 02:47Starting the Gunsmithing: Howa Action Prep
  9. 02:56Howa Action Overview (No Headspacing Tools Needed)
  10. 03:11Removing Original Bottom Metal
  11. 03:25Tools for Removal (Fix It Sticks)
  12. 04:01Removing Action Screws
  13. 04:25Removing Internal Magazine Body
  14. 04:33Preparing Action Screws for MDT Stock
  15. 05:43Dropping Howa Action into MDT Field Stock
  16. 06:03Positioning the Action for Screw Installation
  17. 06:18Loosely Installing Action Screws
  18. 06:45Setting Up Torque Wrench
  19. 07:12Ensuring Proper Action Bedding (Lug Against Chassis)
  20. 07:36Torquing Front Action Screw (45 in-lbs)
  21. 07:45Torquing Rear Action Screw (40 in-lbs)
  22. 08:15Installation Complete: Howa in MDT Stock
  23. 08:19Installing a Rifle Base (EGW 1913)
  24. 08:25Mounting Base in Vice
  25. 08:43Receiver Holes and Base Screws
  26. 09:07Base Screw Lengths (Short Front, Long Rear)
  27. 09:39Preparing Surfaces for Base Mounting
  28. 09:48Cleaning Receiver and Holes (Acetone/Degreaser)
  29. 10:06Using Loctite (Red 271 Recommended)
  30. 10:18Using Torque Attachment for Base Screws
  31. 10:29Selecting Appropriate Bits (T10 for EGW)
  32. 11:07Applying Loctite to Screws
  33. 11:33Installing Base Screws (Not Torqued Yet)
  34. 12:32Torquing Base Screws (15-18 in-lbs for 6-48)
  35. 12:42Wet vs. Dry Torque Values with Loctite
  36. 13:08Torque Sequence for Base Screws
  37. 13:29Base Mounted: Ready for Scope Mounting
  38. 13:35Scope and Ring Mounting (Referenced Video)
  39. 13:411913 Rail Standardization and Versatility
  40. 14:12Tightening Optic Mounts
  41. 14:29Final Check and Range Prep
  42. 14:41Build Summary: Howa Action, MDT Stock, Optic
  43. 14:46Benefits: No Headspacing, No Lathe Needed
  44. 15:04Closing Remarks and Dad Joke
  45. 15:10Questions and Contact Information

Frequently Asked Questions

What tools are needed to install a Howa action into an MDT Field Stock?

You will need a Fix It Sticks Field Armor Kit with T27 and T30 bits, a torque wrench, and an Allen wrench set. The stock typically comes with its own action screws.

What are the recommended torque values for installing a Howa action in an MDT Field Stock?

The video recommends torquing the front action screw to approximately 45 inch-pounds and the rear action screw to approximately 40 inch-pounds. Always consult manufacturer specifications if available.

Can I install a Howa action into an MDT Field Stock without specialized gunsmithing tools like a lathe?

Yes, this installation process for a Howa action into an MDT Field Stock does not require headspacing tools or a lathe, making it accessible for DIY builders. The key is proper bedding and torquing of the action screws.

What are the key features of the MDT Field Stock mentioned in the video?

The MDT Field Stock features an adjustable cheek piece, adjustable length of pull via inserts, sling studs, a vertical grip, an aluminum bed block, and M-LOK slots. It also accepts AICS magazines.

More Gunsmithing & DIY Videos You Might Like

More from Brownells, Inc.

View all →