Ruger 77/22 Firearm Maintenance: Part 1 Disassembly

Published on January 7, 2014
Duration: 2:08

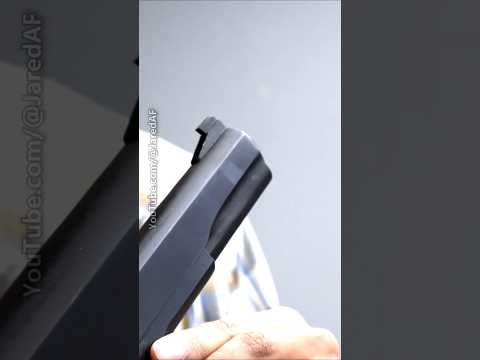
This guide details the step-by-step disassembly of the Ruger 77/22 rifle bolt for maintenance. It covers removing the bolt from the receiver, separating the bolt sleeve, breach block, retaining pin, cocking piece, and firing pin. The video emphasizes safety by ensuring the firearm is unloaded and ammunition is cleared from the workspace. This is presented as Part 1 of a series, with Part 2 focusing on cleaning.

Quick Summary

Disassembling the Ruger 77/22 bolt involves safely removing it from the receiver, then rotating the bolt sleeve clockwise to align the retaining pin for removal. The breach block slides off, followed by using a punch to relieve mainspring tension by rotating the sleeve counter-clockwise to release the firing pin.

Chapters

  1. 00:00Introduction to Ruger 77/22
  2. 00:10Maintenance Series Overview
  3. 00:21Safety First: Unloading and Prep
  4. 00:31Bolt Removal from Receiver
  5. 00:41Bolt Sleeve and Retaining Pin Alignment
  6. 01:03Breach Block Removal
  7. 01:15Cocking Piece and Firing Pin Removal
  8. 01:32Disassembly Complete & Next Steps

Frequently Asked Questions

How do you safely remove the bolt from a Ruger 77/22 rifle?

To safely remove the bolt from a Ruger 77/22, first ensure the rifle is unloaded by removing the magazine and inspecting the chamber. Then, unlock the bolt and pull it halfway back. Press down on the bolt stop on the rear left side of the receiver and then pull the bolt completely out.

What are the key steps for disassembling the Ruger 77/22 bolt?

Disassembling the Ruger 77/22 bolt involves rotating the bolt sleeve clockwise to align the retaining pin with a larger hole, allowing the pin to drop. Then, slide off the breach block. Finally, use a punch to capture the cocking piece while rotating the sleeve counter-clockwise to release the firing pin and mainspring tension.

What tools are needed for Ruger 77/22 bolt disassembly?

For disassembling the Ruger 77/22 bolt, you will primarily need a punch. It's also crucial to wear safety glasses to protect your eyes during the process. Ensure the firearm is unloaded and ammunition is cleared from the work area.

More Gunsmithing & DIY Videos You Might Like

More from Brownells, Inc.

View all →