SKS Full Disassembly & Cleanup

Published on February 28, 2018
Duration: 64:36

This video provides a comprehensive guide to the full disassembly and cleanup of a Sino-Soviet SKS carbine, focusing on removing cosmoline and ensuring proper function. It details step-by-step procedures for taking apart the receiver, bolt, trigger group, gas system, and other components, offering practical tips and warnings to avoid damage. The guide emphasizes thorough cleaning and correct reassembly for safe and reliable operation.
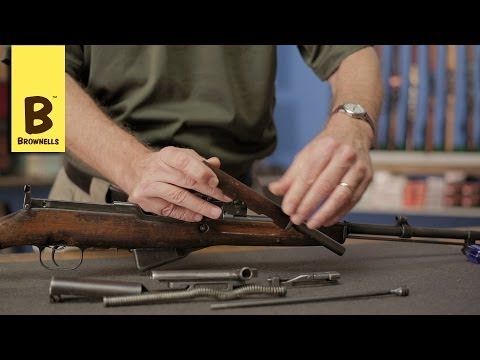
Quick Summary

To disassemble an SKS rifle, first ensure it's unloaded. Remove the receiver cover, recoil spring, bolt carrier, and bolt. Then, place the rifle on safe and carefully push out the trigger group. Remove the magazine, bayonet, and stock. The gas tube and rear sight can then be removed, followed by the bayonet screw. Finally, field strip the bolt and trigger group for cleaning.

Frequently Asked Questions

How do you remove the receiver cover on an SKS rifle?

To remove the SKS receiver cover, locate the lever on the right side of the receiver. Pull this lever upwards to about a 45-degree angle and then out. It's advisable to place your thumb over the back of the cover during this process as it might be under some pressure.

What is the proper way to remove the trigger group from an SKS?

First, ensure the rifle is on safe. Then, use a punch to push the trigger group out from the right side of the receiver. Apply firm downward pressure on the receiver flats to avoid damaging the trigger guard during this step.

How can I clean cosmoline from an SKS rifle's wooden stock?

For the SKS wooden stock, wipe off surface cosmoline with shop towels. For deeper cosmoline, you can let the stock sit in the sun on a hot day to melt and drip out, or use a scribe to gently remove it from cracks and crevices. Finally, apply a furniture wax for protection.

Is it difficult to reassemble the rear sight on an SKS?

Reassembling the SKS rear sight can be challenging due to compressed springs and small parts. It often requires careful manipulation, sometimes using a bit of grease to hold springs, and potentially a vise or extra hands to manage the spring tension during reinstallation.

Related News

All News →

More Gunsmithing & DIY Videos You Might Like

More from Iraqveteran8888

View all →