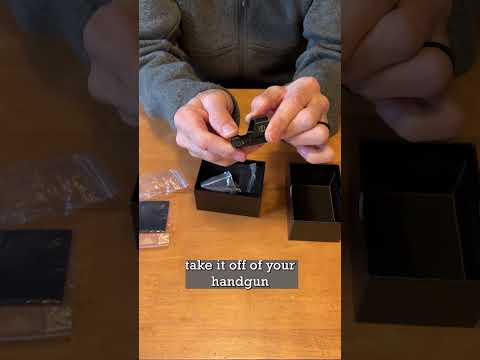
P322 Q&A: Installing RomeoZero Elite

Published on April 25, 2022
Duration: 2:00

This guide details the proper installation of the SIG SAUER RomeoZero Elite optic onto the P322 pistol. Key steps include removing the rear sight, aligning the optic, and crucially, pushing forward on the optic during screw installation to ensure a secure, stable fit. This method prevents lateral movement of the optic, even under impact.

Quick Summary

To properly install a SIG SAUER RomeoZero Elite on a P322, remove the rear sight, align the optic, and crucially, push forward on the optic to fully engage the front curve of the cut before installing screws. This prevents lateral movement and ensures a secure mount.

Chapters

  1. 00:05Introduction to Optic Installation
  2. 00:18RomeoZero Elite Overview
  3. 00:33Removing Rear Sight Assembly
  4. 00:58Optic Installation Procedure
  5. 01:05Crucial Forward Pressure Tip
  6. 01:14Installing Mounting Screws
  7. 01:30Final Installation Recap
  8. 01:38P322 in a Nutshell

Frequently Asked Questions

What is the key step for properly installing a RomeoZero Elite on a SIG P322?

The most critical step is to push forward on the optic to ensure it's fully engaged with the front curve of the slide's optic cut before tightening the mounting screws. This prevents lateral movement and ensures a secure installation.

What are the advantages of the RomeoZero Elite over the original RomeoZero?

The RomeoZero Elite offers an improved design with a glass lens, more rugged construction, and the flexibility to switch between a dot and a circle-dot reticle. It also features a photo-elimination strip for better visibility in low light.

How do you prepare the SIG P322 for RomeoZero Elite installation?

You need to remove the factory rear sight assembly from the P322 slide. The RomeoZero Elite then replaces this assembly directly onto the optic cut.

Why is forward pressure important when installing the RomeoZero Elite on the P322?

Applying forward pressure ensures the optic is seated correctly against the front of the optic cut. This is essential to prevent the optic from shifting or moving laterally if the firearm is bumped or subjected to impact.

Related News

All News →

More Tactical & Gear Videos You Might Like

More from SIG SAUER, Inc

View all →