Anvil 0105: Over/Under stock repair discussion

Published on October 22, 2021
Duration: 24:10

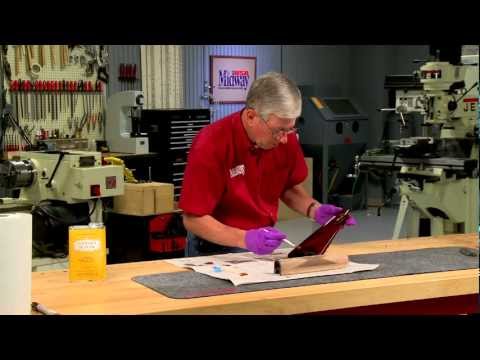
This video details the process of repairing a chipped wooden stock on a Fabarm Elos over/under shotgun, which experienced failure after approximately 35,000 rounds. The instructor emphasizes structural repair over cosmetic fixes, demonstrating how to inlet a new piece of wood, shape it to match the original contour, and ensure proper recoil transfer points. The process involves careful shaping with various tools and attention to detail to achieve a durable and aesthetically pleasing repair.

Quick Summary

Repairing a chipped firearm stock requires more than just cosmetic fixes; it demands structural reinforcement. The process involves carefully inletting a new piece of wood, matching its grain, and meticulously shaping it to blend seamlessly with the original contour. Ensuring proper recoil transfer points and avoiding stress on the repaired area are crucial for a durable, long-lasting fix.

Chapters

  1. 00:03Introduction: Gun Breakage
  2. 00:43Identifying Stock Material
  3. 01:00Damage Assessment: Bedding Failure
  4. 01:31Oil Intrusion in Wood Stock
  5. 01:55Recoil Surfaces Explained
  6. 02:33Preparing Replacement Wood
  7. 03:43Gluing and Curing the Wood Patch
  8. 04:06Shaping the Oversized Wood
  9. 04:55Cutting to Profile and Plan
  10. 05:26Refining the Shape
  11. 06:04Following Stock Contours
  12. 06:34Working with Wood Grain
  13. 07:51Safety: Avoiding Over-Driving Tools
  14. 08:52Using a Japanese Shinto Rasp
  15. 09:20Adjusting Wood Removal
  16. 10:04Adhesive Behavior
  17. 10:36Approaching Final Dimensions
  18. 10:49Transition to Files
  19. 11:05Cleaning Up Lines
  20. 11:39Delineating Edges
  21. 12:00Original Break vs. Repair Line
  22. 12:35Structural vs. Cosmetic Repair
  23. 13:08Using Round Files for Control
  24. 13:44Inside of Stock vs. Repair Piece
  25. 14:23Challenges of Hand Inletting Machine-Made Stocks
  26. 15:11Inletting the Action
  27. 15:27Using Inletting Black
  28. 16:13Structural Integrity Importance
  29. 16:36Cheek Block Movement
  30. 17:01Identifying Failure Planes
  31. 17:11Reinforcing the Repair
  32. 17:31Oil Intrusion Detail
  33. 17:51Line Delineation: Not Sharp
  34. 18:11Fine Wood Removal
  35. 18:31Maintaining Vertical Lines
  36. 18:48Removing Spring Tension
  37. 19:08Stock Spreading Observation
  38. 19:13Achieving Zero Gap Fit
  39. 19:30Accessing Hidden Lines
  40. 19:39Cosmetic Damage vs. Structural Repair
  41. 20:35Achieving No Spring
  42. 20:47Freehand Work and Inletting
  43. 20:53Cutting Back to Action Fit
  44. 21:07Recoil Absorption Strategy
  45. 21:33Parting End Grain
  46. 22:21Working Through Glue
  47. 22:40Repair Completion
  48. 23:18Key Takeaways for Repair

Frequently Asked Questions

How can a chipped firearm stock be repaired?

Repairing a chipped firearm stock involves carefully removing damaged wood, cutting an oversized replacement piece with matching grain, adhering it securely, and then meticulously shaping it to match the original contour using saws, rasps, files, and sandpaper. The goal is to achieve a tight, structurally sound fit that doesn't interfere with the firearm's function.

What is the primary recoil surface on an over/under shotgun stock?

On an over/under shotgun, the primary recoil surface should be located at the rear of the stock, where it contacts the shooter's shoulder. The 'wings' that cover the action sides are primarily for cosmetic purposes and minor protection, not for transferring significant recoil.

Why is it important to avoid cosmetic-only repairs on firearm stocks?

Cosmetic-only repairs on firearm stocks are insufficient because they don't address the underlying structural issues that caused the damage. A proper repair must be structural to prevent the stock from failing again, especially under the stress of recoil during shooting.

What tools are essential for shaping a repaired firearm stock?

Essential tools for shaping a repaired firearm stock include a bandsaw for initial rough cuts, rasps (like Japanese Shinto rasps) for aggressive shaping, files for finer adjustments, chisels for precise material removal, and various grits of sandpaper for smoothing. Sharp tools are critical for control and preventing damage.

More Gunsmithing & DIY Videos You Might Like

More from Mark Novak

View all →