How to Build a Fire Brick D105 Pizza Oven - Part VI - Building the Door Arch

Published on July 15, 2025
Duration: 31:56

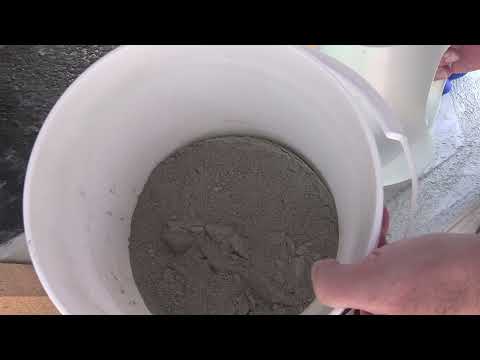
This guide details the process of building the door arch for a D105 fire brick pizza oven. It covers the critical steps of preparing and laying numbered fire bricks using a specialized French mortar called Simol Fondue. Key techniques include ensuring proper brick soaking, achieving the correct mortar consistency, using a support form with shims for easy removal, and carefully cleaning excess mortar. The process emphasizes precision with an eighth-inch joint and the use of a dead blow hammer for adjustments.

Quick Summary

The D105 pizza oven door arch is constructed using numbered fire bricks and a specialized French mortar called Simol Fondue. Bricks must be thoroughly soaked, and the mortar mixed to a plastic consistency. A support form with shims aids in installation and removal, with joints kept to an eighth of an inch for a precise fit.

Chapters

  1. 00:00Introduction to the Entry Arch
  2. 01:02Detailed Construction of the Arch
  3. 02:27Taper in the Back of the Arch
  4. 03:01Interlocking Bricks and Mortar
  5. 03:35Simol Fondue Mortar Explained
  6. 03:56Rebuilding the Arch Due to Mortar Issues
  7. 05:00How Pizza Ovens Work
  8. 05:27Oven Entrance Dimensions
  9. 05:48Installing the Archway
  10. 07:02Unboxing the Ventarch Brick Set
  11. 08:08Preparing Fire Bricks for Installation
  12. 08:30Mixing Simol Fondue Mortar
  13. 08:55Mortar Fizzing and Water's Role
  14. 09:30Estimating Mortar Quantity
  15. 10:10Critical Water Amount for Mortar
  16. 10:48Beginning Arch Assembly
  17. 11:24Laying the First Bricks
  18. 11:50Aligning Brick Numbers
  19. 12:21Working from Both Sides
  20. 13:03Correct Brick Placement
  21. 13:09Managing Excess Moisture
  22. 13:30Pointing Up Later
  23. 13:52Ensuring Flush Bricks
  24. 14:18Checking Brick Numbers
  25. 15:00Returning to the Left Side
  26. 15:25Spreading Bricks for Fit
  27. 15:44Installing the Keystone Brick
  28. 16:01Real-time Installation Process
  29. 16:22Working Bricks into Place
  30. 17:33Mortar Squeezing Out
  31. 17:42Using a Dead Blow Hammer
  32. 18:51Final Brick Placement
  33. 19:07Thixotropic Mortar Explained
  34. 19:46Keystone Brick Installation Complete
  35. 20:02Aligning Bricks
  36. 20:10Lessons Learned from Mortar Water Content
  37. 20:36Finalizing Brick Alignment
  38. 21:19Working in Three Dimensions
  39. 23:07Final Adjustments with Hammer
  40. 23:13Visible Joints and Precision
  41. 23:34Manual Pressing and Thumb Use
  42. 24:06Assessing the Arch's Appearance
  43. 24:33Using a Pointing Trowel
  44. 24:47Mortar Setting Up
  45. 25:06Final Check and Adjustment
  46. 25:32Bricks Firmly Against Form
  47. 25:38Removing Excess Mortar
  48. 26:12Waiting for Mortar to Set
  49. 26:21Removing the Form
  50. 26:29Washing Bricks with Sponge
  51. 26:31Mortar Texture Change
  52. 27:21Removing Shims with Vice Grips
  53. 27:47Form Drops Away
  54. 28:14Form Removal Success
  55. 28:16Cleaning Excess Mortar
  56. 28:28Using a Damp Sponge
  57. 29:19Dragout Tank Analogy
  58. 30:24Cleaning the Sponge
  59. 30:51Swabbing Down Bricks
  60. 31:10Final Result and Day's End
  61. 31:21Thanks to Patrons and Viewers

Frequently Asked Questions

What type of mortar is used for building the fire brick pizza oven door arch?

The video uses a specialized French mortar called Simol Fondue, which is mixed with another mortar component, typically in a 3:1 ratio. It's known for its quick setting time and high strength.

What is the recommended consistency for the Simol Fondue mortar?

The mortar should be plastic enough to flow easily between bricks when squeezed together, but also sticky enough to adhere to a trowel when held upside down. It should not be too soupy or too dry.

How are the fire bricks for the archway prepared before installation?

Before installation, the fire bricks must be thoroughly soaked in water until they are completely wet. This prevents the dry bricks from leaching water from the mortar, ensuring proper adhesion.

What is the purpose of the plastic shims and support form used during arch construction?

The plastic shims and support form provide temporary structural support for the arch while the mortar sets. The shims are designed to allow the form to drop slightly, facilitating its easy removal without damaging the newly built arch.

More Gunsmithing & DIY Videos You Might Like

More from GunBlue490

View all →