Complete Glock Reassembly

Published on February 18, 2014
Duration: 17:50

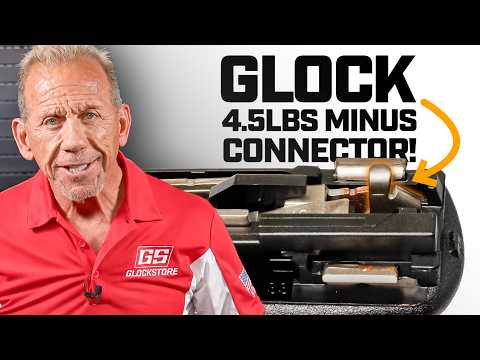
This video provides a comprehensive, step-by-step guide to reassembling a third-generation Glock pistol after complete disassembly. The instructor, demonstrating intermediate skill, walks viewers through reassembling the frame components, including the slide lock, magazine release, and trigger assembly, followed by the slide components like the firing pin safety, extractor, and recoil spring. The guide emphasizes careful attention to detail for each part's placement and orientation, with a strong recommendation to consult professionals if unsure.

Quick Summary

Reassembling a Glock pistol involves carefully placing components like the slide lock spring, magazine release, and trigger assembly into the frame, followed by the firing pin safety, extractor, and recoil spring into the slide. Pay close attention to the orientation of springs and pins, using tools like a punch for assistance, and ensure each part clicks into place for proper function.

Chapters

  1. 00:00Introduction and Disclaimer
  2. 00:35Reassembling the Slide Lock Spring
  3. 01:08Installing the Slide Lock
  4. 02:03Reassembling the Magazine Release
  5. 04:36Assembling the Trigger Housing
  6. 06:45Installing the Trigger Assembly into the Frame
  7. 07:13Inserting the Rear Pin
  8. 07:54Reinserting the Locking Block
  9. 08:21Inserting the Upper Pin
  10. 08:47Inserting the Larger Pin and Slide Stop Lever
  11. 09:42Reassembling the Slide: Firing Pin Safety
  12. 11:32Installing the Extractor
  13. 11:57Reassembling the Extractor Rod and Spring
  14. 12:39Assembling the Firing Pin Assembly
  15. 14:55Installing the Firing Pin Assembly into the Slide
  16. 15:14Reattaching the Slide Cover
  17. 16:24Field Stripped Condition and Barrel Installation
  18. 16:40Installing the Recoil Spring
  19. 16:59Sliding the Slide onto the Frame
  20. 17:14Final Assembly and Conclusion

Frequently Asked Questions

What is the first step in reassembling a Glock pistol frame?

The first step in reassembling a Glock pistol frame is to insert the slide lock spring into its designated slot. This spring is crucial for the proper function of the slide lock mechanism during reassembly.

How do you correctly install the magazine release spring on a Glock?

To install the magazine release spring on a Glock, insert it into the frame so it engages with a small notch. The spring then needs to be pushed to the left to allow the magazine release to be properly seated and function.

What is the correct orientation for the trigger spring during Glock reassembly?

During Glock reassembly, the trigger spring should be oriented to resemble the letter 'S'. This means the open end of the top hook faces right, and the open end of the bottom hook faces left, ensuring it connects properly to the trigger housing and trigger bar.

What is the trickiest part of reassembling a Glock slide?

The trickiest part of reassembling a Glock slide is typically the firing pin assembly. This involves compressing the spring and carefully placing the two half-cups onto the firing pin, which requires precision and can be challenging to execute correctly.

Related News

All News →

More Gunsmithing & DIY Videos You Might Like

More from Guns of the West

View all →