Ruger® SFAR™ Reassembly Tech Tip

Published on September 6, 2022
Duration: 10:03

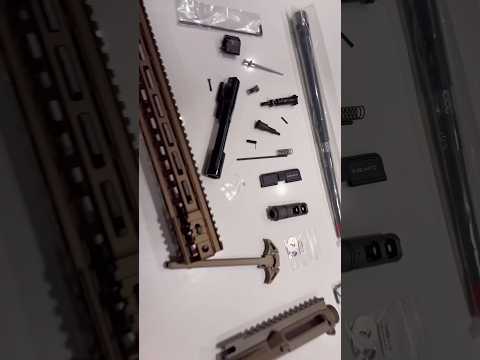
This guide details the reassembly process for the Ruger SFAR (Small Frame AR) rifle, covering bolt carrier group assembly, gas regulator and handguard installation, and essential function checks. It emphasizes the use of specific tools like a torque wrench and Allen wrenches, along with critical safety precautions. The instruction is delivered by a Ruger technician, providing expert-level guidance for intermediate users.

Quick Summary

Reassembling the Ruger SFAR requires specific tools like a torque wrench (44-55 in-lbs), 3/16" and 5/32" Allen wrenches, and a 1/16" punch. Key steps include correctly aligning gas rings, installing the firing pin retaining pin with the longer leg forward, and torquing handguard screws. Always perform a function check after reassembly.

Chapters

  1. 00:00Introduction & Safety Check
  2. 00:29Tools Required
  3. 00:55Bolt Carrier Group Assembly
  4. 01:33Bolt Assembly: Extractor & Pin
  5. 02:07Bolt Assembly: Ejectors & Movement
  6. 02:27Gas Ring Alignment
  7. 02:45Inserting Bolt into Carrier
  8. 02:54Cam Pin Installation
  9. 03:17Firing Pin Installation
  10. 03:25Retaining Pin Installation
  11. 04:05Upper Receiver: Gas Regulator
  12. 04:29Gas Regulator Plunger Compression
  13. 04:48Handguard Installation
  14. 05:45Handguard Screw Installation & Torque
  15. 06:43Lower Receiver: Buffer & Spring
  16. 07:04Connecting Upper and Lower Receivers
  17. 07:25Charging Handle & Bolt Carrier Insertion
  18. 07:57Final Pin Installation
  19. 08:08Function Check: Safety & Trigger
  20. 08:35Function Check: Trigger Reset
  21. 08:54Function Check: Bolt Cycling & Binding
  22. 09:23Function Check: Magazine Insertion & Release
  23. 09:35Final Inspection & Conclusion

Frequently Asked Questions

What tools are essential for reassembling the Ruger SFAR?

Essential tools for reassembling the Ruger SFAR include a torque wrench set to 44-55 inch-pounds with a 5/32 drive, a 3/16 ball end Allen wrench, a 5/32 Allen wrench, and a 1/16 punch. Safety glasses are also mandatory.

How do you properly install the gas regulator on the Ruger SFAR?

To install the gas regulator, align its flat on the outer ring with the corresponding feature on the upper receiver. You'll need to compress the internal plunger using a punch or Allen wrench to rotate it into the correct position.

What is the correct torque specification for the Ruger SFAR handguard screws?

The handguard screws for the Ruger SFAR should be torqued to a specification between 44 and 55 inch-pounds. Using a torque wrench ensures proper tightness without damaging the components.

What is a common mistake to avoid during Ruger SFAR reassembly?

A common mistake to avoid is forcing the firing pin retaining pin. If it doesn't slide in easily, use a punch beside the firing pin to gently compress it, rather than hammering it, to prevent damage.

More Gunsmithing & DIY Videos You Might Like

More from RugerFirearms

View all →